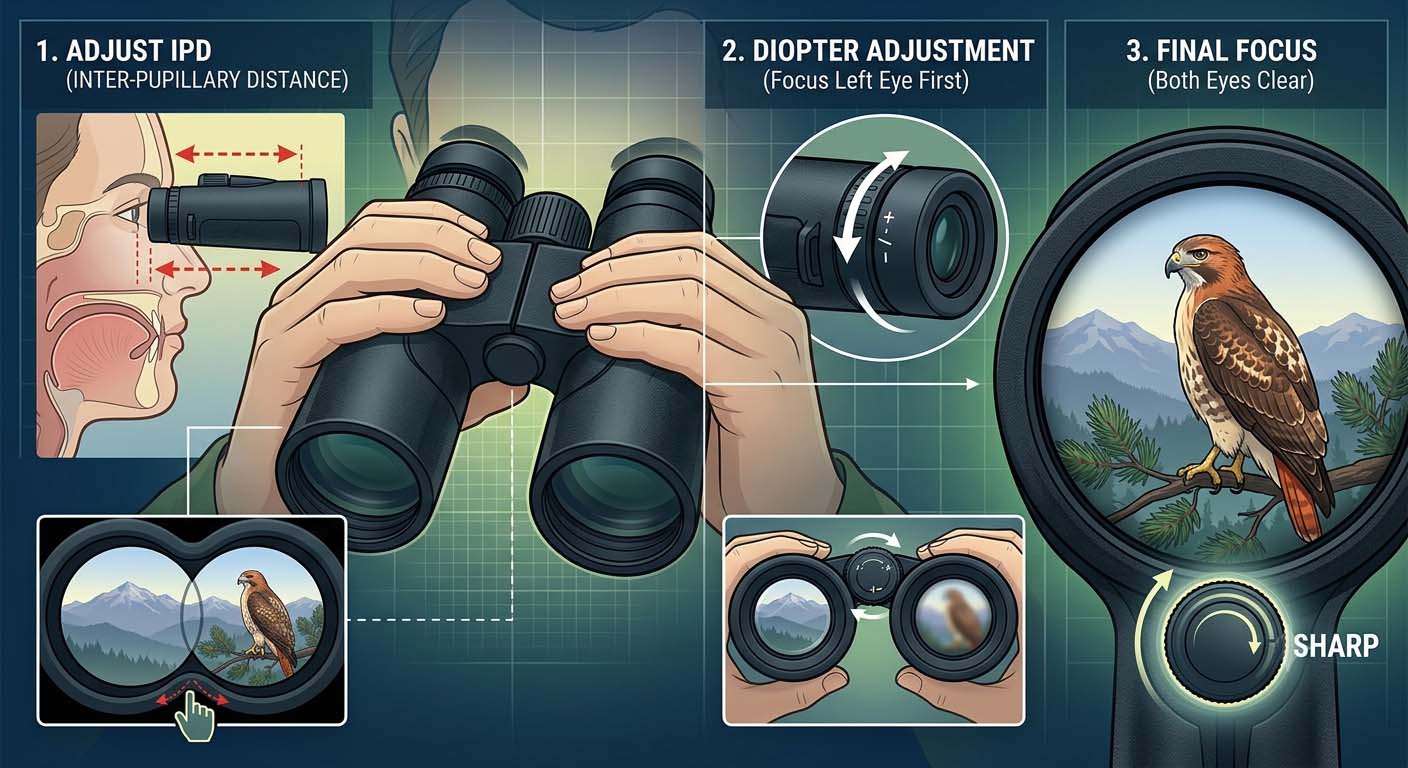
If you close one eye and the view is sharp, but with both eyes open it’s blurry or strains your eyes, that’s the classic sign your binoculars aren’t set for your eyes. I’ve been there myself, frustrated with a pair of nice binoculars that just wouldn’t cooperate. The good news is that fixing it is simple once you know what to do.
Adjusting binoculars for your eyes requires three coordinated steps: setting the eye relief, adjusting the interpupillary distance (IPD), and fine-tuning the diopter. Then you run a quick test to confirm everything is aligned.
Below I’ll walk you through each part, including how to fix common problems like double vision or blurry edges. By the end, you’ll get crisp, comfortable views every time you raise the binoculars.
Understanding the Three Main Adjustments
Before you start twisting rings and turning wheels, it helps to know what each control does. Think of these adjustments as tailoring the binoculars to fit your face and eyes the way you’d adjust a seat in a car.
Eye relief (eyecups) controls the distance between your eye and the rear lens. If you wear glasses, you need more eye relief to see the full field of view. If you don’t, you can bring the eyecups up to block stray light. The eyecups are usually twist-up or fold-down rubber rings.
Interpupillary distance (IPD) is the width between your eyes. Everyone’s IPD is different. When you look through binoculars, the two barrels must match your IPD. If they’re too far apart or too close, you’ll see a black ring or a doubled image.
Most binoculars have a hinge that lets you move the barrels closer together or farther apart.
Diopter is a fine focus adjustment for the right eye (or sometimes the left). Because your two eyes rarely have identical vision, the diopter compensates for that difference.
Once you set it, you can leave it alone unless your prescription changes or someone else uses the binoculars.
Step-by-Step Setup for Sharp Vision
Follow this sequence exactly. It works for all binoculars, whether you’re using a Nikon, Swarovski, Vortex, or a budget model.
1. Set the Eyecups for Your Eyes
- If you wear glasses: Twist or fold down the eyecups all the way. This brings your glasses closer to the rear lens so you can see the full circle of the image. If you don’t do this, you’ll see a black shadow around the edges (vignetting).
- If you don’t wear glasses: Twist the eyecups up to the highest position. This keeps your eyes at the correct distance and blocks side light. If you’re not sure, start with the eyecups fully extended, then lower them step by step until you see the full field of view without black rings.
2. Adjust the Interpupillary Distance (IPD)
Hold the binoculars up to your eyes normally. Look at a distant object, a tree, a sign, anything at least 50 feet away. While keeping your eyes on the object, push the two barrels toward each other or pull them apart until you see a single, clear circle without any black crescent or double image.
The IPD scale (usually marked on the hinge) can help you remember your setting for future use.
3. Set the Diopter
This is the step most people get wrong. The diopter ring is usually on the right eyepiece, sometimes with a lock (push-pull, ring, or center wheel). Here’s the correct method:
- Cover the right lens completely with your hand (or a lens cap). Do not squint — just block the light.
- Using the center focus wheel, focus on a detailed target (like a sign with text or a branch) using only your left eye. Make it as sharp as possible.
- Keep your hand covering the right lens. Now switch: cover the left lens and uncover the right. Do not touch the center focus wheel.
- Look through the right eye only. Turn the diopter ring (or adjust the diopter wheel) until the same target is perfectly sharp. This compensates for the difference between your two eyes.
- Uncover both lenses. Look through the binoculars with both eyes open. The image should now be crisp and comfortable. If it’s still slightly off, repeat the process.
Pro tip: If your binoculars have a locking diopter (like many Swarovski or Vortex models), tighten the lock after setting it. For non-locking diopters, I use a tiny piece of tape to mark the position so I don’t accidentally bump it.
4. The Sanity Check
After you’ve set the diopter, do a quick test. Look at a horizontal line, like a roof edge, a power line, or the bottom of a window. With both eyes open, the line should appear as a single straight line. If it looks double or tilted, your IPD or diopter is off. Go back to step 2 and recheck.
Common Mistakes That Ruin Your View (and How to Fix Them)
Even after following the steps, you might still have problems. Here are the most common ones I’ve run into and how to fix them.
Double vision or one eye sees a separate image
This is almost always an IPD problem. Push the barrels closer together or farther apart until the two circles merge into one.
If that doesn’t work, check that both eyecups are set to the same height. If you still see double, the binoculars may be internally misaligned (collimation issue) and need professional repair.
Only one side is in focus
You likely set the diopter incorrectly. Repeat the diopter process, making sure you don’t touch the center focus wheel after step 2. Another cause: the diopter ring slipped. If your binoculars don’t have a lock, check that the ring hasn’t moved.
Blurry edges or blurry center
First, clean the lenses with a microfiber cloth; a smudge can cause blur. If the lenses are clean, your diopter might be wrong. Reset it.
If the blur only appears when you move your eyes to the edge, that’s normal for many budget binoculars (field curvature). But if the center is blurry with both eyes open, the central focus wheel might need lubrication or the binoculars are out of collimation.
Black rings around the image (vignetting)
This means your eyes are too far from the rear lens. If you wear glasses, make sure the eyecups are fully down.
If you don’t wear glasses, twist the eyecups up one notch at a time until the black ring disappears. Also check your IPD; a misaligned IPD can cause a crescent shadow.
Why Your Binoculars Still Feel Wrong After Adjustment?
Sometimes you follow every step, everything looks sharp, but your eyes hurt or the image “blackes out” when you move the binoculars. That’s usually an eye relief problem.
Eye relief is the hidden culprit
Every binocular has a set eye relief distance (usually listed in the specs, like 15mm or 18mm). You need to match that distance with your actual eye position. If you’re too close or too far, you’ll see a black ring or the image will flash on and off when you move. Here’s how to measure:
- Hold the binoculars about 1 inch from your eyes. Slowly move them closer until you see the full circle of the image. That’s the correct eye relief distance.
- If you wear thick glasses, your effective eye relief is shorter because the glasses take up space. You may need binoculars with at least 15mm of eye relief, or better, 18mm or more.
- If you don’t wear glasses, your eyes can rest closer to the eyepiece, so you can use shorter eye relief binoculars.
To test if eye relief is your issue: look at a bright sky through the binoculars. If you see a black ring that moves when you tilt your head, your eye relief is wrong. Adjust the eyecups until the ring disappears.
Eye strain or headaches
This almost always comes from incorrect IPD or diopter. Even a tiny misalignment forces your eye muscles to work harder. Recheck both settings. Also, if you’ve been using binoculars for more than 10 minutes and your eyes feel tired, take a break. Your eyes need time to relax.
Fine-Tuning for Your Activities and Eyewear
Binoculars get used for different things, and the same adjustment can be optimized for the task.
Birding
You need quick focus and a wide depth of field. Set the diopter once, then use the center focus wheel to track moving birds. Keep the eyecups at the correct height for your eyes.
If you wear glasses, choose your binoculars with long eye relief (17mm+), so you can see the whole field without pushing your glasses against the eyecups.
Stargazing
For astronomy, you’ll be focusing at infinity most of the time. Set the diopter carefully on a bright star or the moon. Then, once the center focus wheel is set to infinity, you only need to adjust for nearby objects.
Because stars are pinpoint, any misalignment in IPD or diopter will show as double stars. Use the horizontal line test to confirm.
Sports and wildlife
Speed matters. You want a wide field of view and fast focusing. I recommend setting the IPD and diopter ahead of time, then using the center wheel to track action. If you switch between close and far subjects, you might need to adjust the diopter slightly, but only if your eyes are very different.
Glasses versus contacts versus no correction
- Glasses: Always twist eyecups down. Measure your eye relief (the distance from your glasses lens to your eye). If your binoculars have less than 12mm of eye relief, you’ll struggle to see the full field. For high prescription glasses, especially with astigmatism, the diopter setting will be different from your glasses prescription because the binoculars add their own optics. The diopter setting is what works for your eyes looking through the binoculars, not the number on your prescription.
- Contact lenses: Contacts are part of your eye. Set the diopter using your normal contact lens correction. The eyecups can be set to the no-glasses position (up) because contacts don’t add distance.
- No correction: Follow the standard steps. If you have perfect vision, the diopter might be at zero or very close to it.
Frequently Asked Questions
How often should I reset the diopter?
Only when your prescription changes, or when someone else uses the binoculars. If you share your binoculars, jot down your diopter setting (the number on the ring) so you can quickly return to it.
Can I adjust binoculars for kids?
Yes, but check the IPD range. Many adult binoculars don’t close narrow enough for a child’s face. Some kids’ binoculars have a fixed IPD. If the child’s eyes are too close together, they’ll see a double image. For most kids over 8, standard adult binoculars work if you adjust the IPD as far as it goes.
What is the best way to measure my IPD at home?
Look at a distant object and hold a ruler under your eyes. Have a friend measure the distance between the centers of your pupils. That’s your IPD in millimeters. Most binoculars have a scale on the hinge, you can match it to your measurement.
Do I need to adjust for wearing contacts?
No. Contacts are part of your eye. Set the diopter while wearing your contact lenses as you normally would. If you switch between contacts and glasses, you’ll need to reset the diopter each time.
How do I clean the lenses after adjusting?
Use a microfiber cloth and a lens cleaning solution meant for optics. Do not use paper towels or your shirt, they can scratch the coatings. Gently wipe in a circular motion from the center outward. Avoid touching the diopter ring if you don’t want to move it.
Does altitude affect binocular adjustment?
Extreme altitude changes (like from sea level to a mountain summit) can change the internal air pressure, which might shift the focus slightly. If you notice blur after a big climb, recheck the diopter. It’s rare, but it happens.
Final Thoughts
Adjusting binoculars for your eyes isn’t complicated, but it does require patience and a systematic approach. The three adjustments- eye relief, IPD, and diopter- work together. Skip one, and you’ll never get the perfect view.
Take the time to set them right, and you’ll unlock a world of crisp, comfortable detail every time you raise the binoculars. Whether you’re birding, stargazing, or watching the game, your eyes will thank you.